To get better scanning models, we would like to share some tips of how to choose the proper alignment mode with EinScan-Pro or Pro+ on Automatic Scan Mode -Turntable. There are four different alignment modes for “Autoscan:”
-
Turntable coded target alignment
-
Targets alignment
-
Feature alignment
-
Global registration alignment
The selection of the proper mode depends on the object you want to scan and is only influenced by the shape of the object. It will not affect the level of details or accuracy. Let’s take next a detailed view of each of the four alignment modes.
Turntable coded target alignment
If the size of the object is not too big, and you do not want to stick targets to it, such as an antique, the turntable coded target alignment is the best choice. It is the most convenient mode among all four scanning modes; it is highly recommended for use in most cases. The turntable coded target alignment works as follows: on every step of the turntable, the scanner recognizes common targets on the turntable to calculate the new position of the object. At least 4 common targets need to be recognized between 2 successive scans.
A big advantage of using turntable coded target alignment is that you do not need to stick targets on the object to be scanned. Also, during several scans, if the distance between the position of the camera and the turntable changes a little, you do not need to redo the calibration and can still complete the alignment without any problem.
-
If the object is very small, it will not hide the targets on the turntable helping to avoid the use of targets on the object. Place the object on the middle of the turntable and make sure it will not shake or move during rotation.


Targets alignment and global registration alignment
Targets alignment is used when scanner’s optics cannot find the target on the turntable. The targets alignment works in a way similar to the turntable coded target alignment; the software matches 2 successive scans by recognizing at least 4 common targets.


The global registration uses the same method as targets alignment. When creating a new project you have to import a file with the targets, known as global registration file or .p3 file. This file can be saved from a previous project using fixed scan mode, or HD Handheld Scan Mode.

The targets file is saved as .p3, we call it “global registration”

You can import a global registration file when you create a new project

The global registration file contains the targets position
-
For both targets alignment and global registration alignment, if some targets have previously been scanned and imported, users need to stick enough targets so that the scanner can match successive scans. To make sure that the scanner follows these successive captures you might have to increase the number of turntable steps from 8 to 12. For example,. as indicated in the software you should hide the turntable targets to avoid misalignment

You might have to increase the number of turntable steps to be sure that the scanner always recognizes targets
Feature alignment
When the size of the object that you will scan is too big for the turntable coded target alignment, and you do not want or cannot stick targets on it, then a feature alignment is recommended. With feature alignment, the software recognizes features on 3 successive preliminary scans, then calculates the distance between the position of the camera and the turntable. The scans are matched (registered) by knowing the center and angle of rotation between successive captures.

With feature alignment, the user needs to make sure that the object is stable on the turntable first, and the first view should contain enough features to allow the initialization. Objects with too plain features such as planes and symmetric surfaces like sphere, cylinder or circular pattern, are not recommended for this mode. Better use targets to facilitate the alignment.


During the “verifying” steps, the software calculates the distance between the position of the camera and turntable
Alignment of Two Scans
When you perform several automatic scans or fixed scans, there are two ways to align two scans together when using the EinScan software.
It works following order:
-
If four common targets matched those on the scans, the alignment will be done automatically.
-
If no targets, the software will try to recognize features and calculate the alignment.
-
If the automatic alignment fails, you can use manual alignment.
Manual Alignment
-
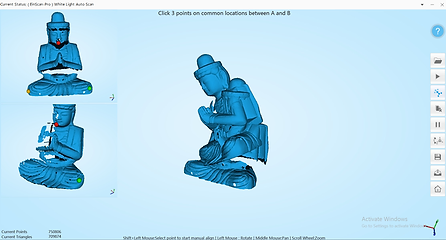
By clicking Manual Alignment, two small windows will pop-up on the left corner: One is at the top, the global data; the other one is at the bottom, the recent data.
-
Control those pop-up windows with the same method to control the main window: Scroll to zoom in, right click to rotate, middle click to pan. Press Shift and right click to place an alignment point on the scan.

Place the alignment points at the same position on the object on both screen

The alignment result using Manual Alignment
-
Once you have selected three common points on the two windows, the software will calculate the alignment.
-
If the result is not satisfactory, click on Manual Alignment again and redo the operation; or click Delete Scan, and redo the latest scan with different parameters or position of the object.


